Blog Categories
Recent Post


What is an Apple Airtag ?How to set up Apple Airtag to the phone
October 1, 2023

How to get to home screen on kindle
September 26, 2023

What is stuff your kindle day? The Essence of ‘Stuff Your Kindle’ Day
September 26, 2023

Amazon’s GPT55X: A Comprehensive Overview
September 25, 2023

VTech RM7764HD 1080p WiFi Remote Access Baby Monitor Guide How to Set Up
September 25, 2023


FEBFOXS Baby Monitor Security Camera, Pet Camera Guide How to Set Up
September 25, 2023

What you should to know about amazon or amazon.com
August 29, 2023

Gaggia Classic Pro Review 2023
August 29, 2023
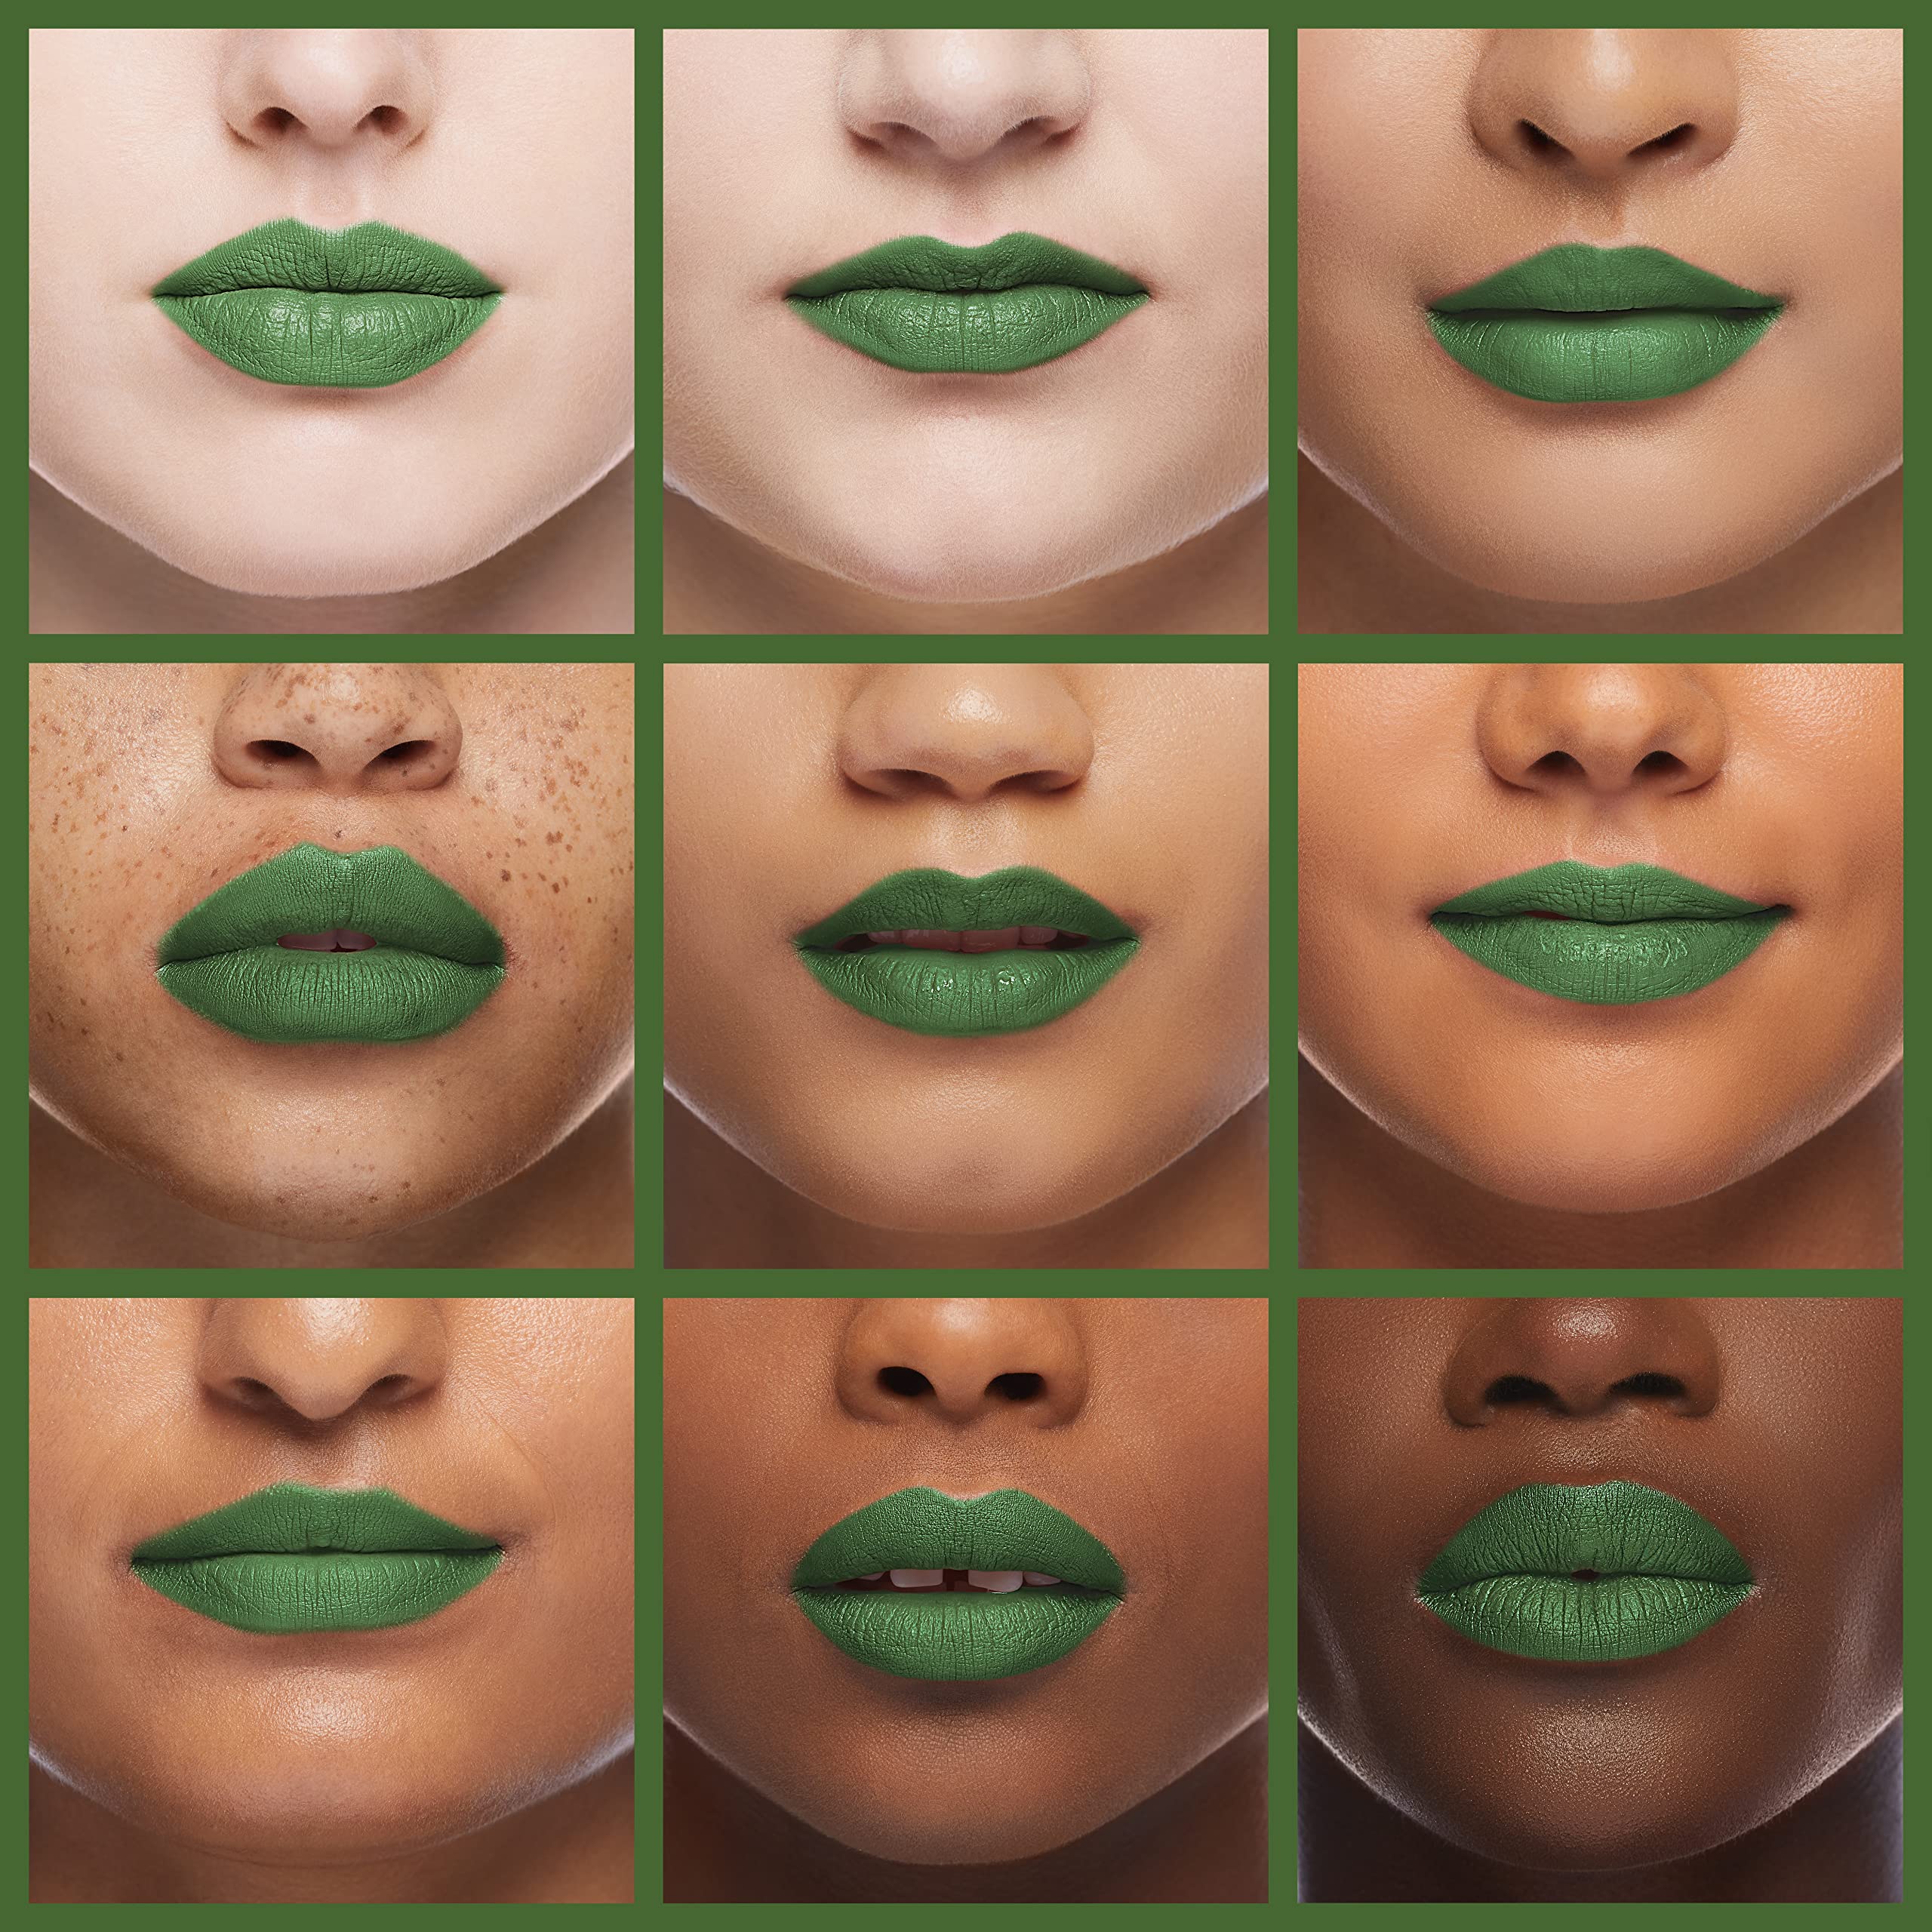
How to make green lipstick
August 28, 2023
10 Best natural makeup with red lipstick ideas
August 28, 2023
Guide to achieve a beautiful lip makeup .
August 12, 2023

The 5 Best Vacuum Robot Cleaners For Your Home
August 12, 2023
The best loreal moisturizer for your skins in 2023
August 9, 2023
August 28, 2023
10 Best natural makeup with red lipstick ideas
10 best natural makeup with red lipstick ideas
Creating a natural makeup look with red lipstick can strike a perfect balance between boldness and subtlety. Here are ten ideas to inspire your makeup routine:
1. Flawless Canvas:
Start with a light, dewy foundation to even out your skin tone.
Apply a natural-toned blush on the apples of your cheeks for a soft flush.
Subtle Smokey Eyes:
Use earthy tones like taupe and brown on your eyelids for a subtle smokey effect.
Apply a thin line of brown eyeliner close to your lash line for definition.
Minimalist Elegance:
Opt for a clean, minimalist look with just a touch of mascara on your lashes.
Apply a nude eyeshadow to add a slight dimension to your eyes.
Glowing Goddess:
Highlight your cheekbones, bridge of your nose, and cupid’s bow for a radiant look.
Keep your eye makeup simple with a neutral eyeshadow and mascara.
Classic Cat-Eye:
Create a delicate winged eyeliner look to enhance your eyes.
Pair it with a subtle, matte eyeshadow in a neutral shade.
Monochromatic Vibes:
Use a soft, rosy blush on your cheeks and eyes for a harmonious monochromatic look.
Apply a sheer layer of nude lipstick to complement the red.
Natural Glam:
Apply a shimmery champagne eyeshadow on your lids.
Use a lengthening mascara to make your lashes pop without being too dramatic.
Fresh and Youthful:
Opt for a tinted moisturizer for a fresh-faced appearance.
Use a soft pink blush on your cheeks for a youthful flush.
Bronzed Beauty:
Apply a warm bronzer to the hollows of your cheeks, temples, and jawline.
Keep your eye makeup minimal with a swipe of brown eyeshadow and mascara.
Luminous Eyes:
Use a pearl or champagne eyeshadow on your eyelids to brighten your eyes.
Apply a thin line of brown eyeliner and a coat of mascara.
Remember, the key to a natural makeup look is to enhance your features while keeping the focus on the bold red lipstick. Feel free to mix and match these ideas to create your perfect natural makeup look with red lipstick.
1.Flawless Canvas
- Start with a light, dewy foundation to even out your skin tone.
- Apply a natural-toned blush on the apples of your cheeks for a soft flush.
Here’s a step-by-step guide to achieving this look:
Products You’ll Need:
- Light, dewy foundation
- Natural-toned blush
- Red lipstick
- Mascara
- Eyebrow pencil or powder (optional)
- Translucent setting powder (optional)
- Makeup brushes and sponges
Step 1: Prep Your Skin:
- Start with a clean and moisturized face. Apply a hydrating primer if needed to create a smooth base.
Step 2: Apply Foundation:
- Choose a light, dewy foundation that matches your skin tone. Apply a small amount to the center of your face and blend outward using a makeup sponge or brush. Focus on creating an even and radiant complexion.
Step 3: Conceal Imperfections:
- Use a creamy concealer to cover any blemishes, redness, or under-eye circles. Blend the concealer gently with your fingers or a makeup sponge.
Step 4: Set with Translucent Powder:
- If you have oily skin or want to prolong the makeup’s wear, lightly dust a translucent setting powder over your T-zone using a fluffy brush.
Step 5: Apply Blush:
- Choose a natural-toned blush in shades like peach, rose, or soft pink. Smile to locate the apples of your cheeks and gently apply the blush using a blush brush.
- Blend the blush upward along your cheekbones for a soft flush that complements the red lipstick.
Step 6: Define Your Brows (Optional):
- Use an eyebrow pencil or powder to fill in your eyebrows, creating a natural shape that frames your face. Brush through your brows to blend the product for a soft finish.
Step 7: Apply Mascara:
- Apply one or two coats of mascara to your upper and lower lashes. Wiggle the wand at the base of your lashes and sweep upward to add definition and length.
Step 8: Red Lipstick:
- Choose a classic red lipstick that complements your skin tone. For a natural look, you can opt for a satin or creamy finish.
- Carefully apply the red lipstick to your lips, starting from the center and moving outward. You can use a lip brush for precise application.
Step 9: Finishing Touches:
- Gently blend any harsh edges in your makeup using a clean brush or sponge.
- If you prefer a dewy finish, you can use a facial mist or setting spray to set your makeup while adding a natural glow.
And there you have it – the “Flawless Canvas” natural makeup look with red lipstick! This look emphasizes a radiant complexion, soft blush, and a bold red lip, creating a harmonious and balanced appearance.
2. Subtle Smokey Eyes
- Use earthy tones like taupe and brown on your eyelids for a subtle smokey effect.
- Apply a thin line of brown eyeliner close to your lash line for definition.
Here’s a step-by-step guide to achieving this look:
Products You’ll Need:
- Earthy-toned eyeshadows (taupe, brown)
- Brown eyeliner pencil or gel eyeliner
- Red lipstick
- Mascara
- Eyebrow pencil or powder (optional)
- Eyeshadow brushes
- Blending brush
Step 1: Prep Your Eyes:
- Start with a clean eyelid. You can apply an eyeshadow primer to ensure your eyeshadow stays in place and appears more vibrant.
Step 2: Apply Earthy-Toned Eyeshadows:
- Begin by applying a soft taupe eyeshadow across your entire eyelid using a flat eyeshadow brush.
- Use a slightly darker brown eyeshadow and apply it to the outer corner of your eyelid and into the crease using a blending brush. Blend well to create a seamless transition between the colors.
Step 3: Define the Lower Lash Line:
- Use the same darker brown eyeshadow to softly define your lower lash line. Apply it with a small pencil brush or a smudge brush.
Step 4: Apply Eyeliner:
- Choose a brown eyeliner pencil or gel eyeliner for a softer look. Apply a thin line of eyeliner along your upper lash line. Keep the line close to the lashes for a subtle definition.
- If desired, you can apply a tiny bit of the same eyeliner to the outer half of your lower lash line, connecting it to the upper liner. This will add a bit more definition without making the eyes look too harsh.
Step 5: Curl Lashes and Apply Mascara:
- Curl your eyelashes with an eyelash curler to open up your eyes.
- Apply a coat or two of mascara to both your upper and lower lashes for added length and volume.
Step 6: Optional Brow Definition:
- If you’d like, use an eyebrow pencil or powder to define your brows and create a polished frame for your eyes.
Step 7: Red Lipstick:
- Choose your favorite red lipstick shade that complements your skin tone and outfit.
- Carefully apply the red lipstick to your lips, using a lip brush if desired, for precise application.
Step 8: Finishing Touches:
- Gently blend any harsh lines in your eyeshadow using a clean blending brush.
- If you prefer a dewy finish, you can use a facial mist or setting spray to set your makeup while adding a natural glow.
- And there you have it – the “Subtle Smokey Eyes” natural makeup look paired with red lipstick. This look adds a touch of mystery and depth to your eyes while keeping the overall appearance understated and elegant.
3 Minimalist Elegance
- Opt for a clean, minimalist look with just a touch of mascara on your lashes.
- Apply a nude eyeshadow to add a slight dimension to your eyes.
Here’s a step-by-step guide to achieving this look:
Products You’ll Need:
- Nude eyeshadow
- Mascara
- Red lipstick
- Brow gel or clear brow mascara (optional)
- Tinted moisturizer or light foundation (optional)
- Translucent setting powder (optional)
- Makeup brushes
Step 1: Prep Your Skin:
- Begin with a clean and moisturized face. If desired, you can apply a light layer of tinted moisturizer or a sheer foundation for a fresh, even complexion.
- Set your makeup with translucent setting powder, focusing on the T-zone if needed.
Step 2: Apply Nude Eyeshadow:
- Choose a neutral, nude eyeshadow shade that’s a few shades lighter than your skin tone.
- Apply the nude eyeshadow all over your eyelids using an eyeshadow brush. This will add a subtle dimension and brightness to your eyes.
Step 3: Enhance Your Lashes:
- Coat your upper and lower lashes with a layer of mascara to define and open up your eyes.
- For a more natural effect, you can use a brown or black-brown mascara.
Step 4: Red Lipstick:
- Select a red lipstick shade that complements your skin tone and the overall vibe of the look.
- Apply the red lipstick to your lips, starting from the center and moving outward. Use a lip brush for precise application if desired.
Step 5: Groom Your Brows (Optional):
- If you’d like to define your brows without making them too bold, use a clear brow gel or clear brow mascara to groom them and keep them in place.
Step 6: Finishing Touches:
- Gently blend any harsh edges in your makeup using a clean brush or sponge.
- If you prefer a dewy finish, you can use a facial mist or setting spray to set your makeup while adding a subtle glow.
- And there you have it – the “Minimalist Elegance” natural makeup look paired with red lipstick. This look is all about enhancing your features in a subtle and refined manner, allowing the red lipstick to take center stage while maintaining an effortless and elegant appearance.
4. Glowing Goddess
- Highlight your cheekbones, bridge of your nose, and cupid’s bow for a radiant look.
- Keep your eye makeup simple with a neutral eyeshadow and mascara.
Here’s a step-by-step guide to achieving this luminous and radiant look:
Products You’ll Need:
- Cream or liquid highlighter
- Neutral eyeshadow
- Mascara
- Red lipstick
- Brow pencil or powder (optional)
- Tinted moisturizer or light foundation (optional)
- Translucent setting powder (optional)
- Makeup brushes
Step 1: Prep Your Skin:
- Begin with a clean, moisturized face. If desired, apply a light layer of tinted moisturizer or a sheer foundation for a fresh base.
- Set your makeup with translucent setting powder, especially on areas that tend to get oily.
Step 2: Highlighting:
- Use a cream or liquid highlighter to emphasize the high points of your face: the tops of your cheekbones, the bridge of your nose, and your cupid’s bow (the area right above your upper lip).
- Gently pat the highlighter onto these areas using your fingertips or a makeup sponge. Blend it for a natural, radiant glow.
Step 3: Apply Neutral Eyeshadow:
- Choose a neutral eyeshadow shade that’s close to your skin tone or a shade slightly lighter.
- Apply the neutral eyeshadow all over your eyelids using an eyeshadow brush to create a soft, natural-looking base.
Step 4: Mascara for Simple Eyes:
- Coat your upper and lower lashes with mascara to enhance your eyes without making them overly dramatic.
- A lengthening or defining mascara will work well for this understated look.
Step 5: Red Lipstick:
- Select a red lipstick that complements your skin tone and adds a touch of boldness to the look.
- Apply the red lipstick to your lips, ensuring even coverage. Use a lip brush for precise application if desired.
Step 6: Optional Brow Definition:
- If desired, use a brow pencil or brow powder to define and fill in your brows. Opt for a natural shape that complements your face.
Step 7: Finishing Touches:
- Gently blend any harsh edges in your makeup using a clean brush or sponge.
- For a final touch, you can use a facial mist or setting spray to set your makeup while adding a radiant finish.
- And there you have it – the “Glowing Goddess” natural makeup look paired with red lipstick. This look focuses on creating a luminous complexion with highlighted features, while keeping the eye makeup simple and allowing the red lips to stand out beautifully.
5. Classic Cat-Eye
- Create a delicate winged eyeliner look to enhance your eyes.
- Pair it with a subtle, matte eyeshadow in a neutral shade.
Here’s a step-by-step guide to achieving this timeless and elegant look:
Products You’ll Need:
- Black liquid or gel eyeliner
- Matte neutral eyeshadow
- Red lipstick
- Mascara
- Brow pencil or powder (optional)
- Tinted moisturizer or light foundation (optional)
- Translucent setting powder (optional)
- Makeup brushes
Step 1: Prep Your Skin:
- Begin with a clean, moisturized face. Apply a light layer of tinted moisturizer or a sheer foundation to create an even canvas.
- Set your makeup with translucent setting powder, especially on areas that tend to get oily.
Step 2: Matte Neutral Eyeshadow:
- Choose a matte neutral eyeshadow in a shade that matches your skin tone or is slightly lighter.
- Apply the matte eyeshadow all over your eyelids using an eyeshadow brush to create a smooth base for your eyeliner.
Step 3: Create the Classic Cat-Eye:
- Using a black liquid or gel eyeliner, start by drawing a thin line along your upper lash line, staying as close to the lashes as possible.
- To create the cat-eye wing, extend the eyeliner slightly beyond the outer corner of your eye, angling it upward. The angle and length of the wing are up to your preference.
- Connect the wing back to the rest of the eyeliner, creating a smooth, delicate flick.
Step 4: Apply Mascara:
- Coat your upper and lower lashes with mascara to define and lengthen them, enhancing the cat-eye effect.
- Consider using a volumizing mascara to give your lashes more impact.
Step 5: Red Lipstick:
- Choose a red lipstick that complements your skin tone and adds a bold element to the look.
- Apply the red lipstick to your lips, ensuring an even and precise application. A lip brush can help achieve a polished look.
Step 6: Optional Brow Definition:
If desired, define your eyebrows using a brow pencil or brow powder. Create a clean, polished shape that frames your eyes.
Step 7: Finishing Touches:
- Gently blend any harsh edges in your makeup using a clean brush or sponge.
- Consider using a setting spray to set your makeup while adding a subtle glow and enhancing its longevity.
And there you have it – the “Classic Cat-Eye” natural makeup look paired with red lipstick. This look focuses on enhancing your eyes with a timeless winged eyeliner while keeping the rest of the makeup understated, letting the bold red lips take center stage.
6. Monochromatic Vibes.
- Use a soft, rosy blush on your cheeks and eyes for a harmonious monochromatic look.
- Apply a sheer layer of nude lipstick to complement the red.
Certainly, let’s proceed with the “Monochromatic Vibes” natural makeup look combined with red lipstick. Here’s a step-by-step guide to achieving this harmonious and cohesive look:
Products You’ll Need:
- Rosy blush
- Sheer nude lipstick
- Red lipstick
- Neutral eyeshadow
- Mascara
- Brow pencil or powder (optional)
- Tinted moisturizer or light foundation (optional)
- Translucent setting powder (optional)
- Makeup brushes
Step 1: Prep Your Skin
- Begin with a clean, moisturized face. Apply a light layer of tinted moisturizer or a sheer foundation for a radiant base.
- Set your makeup with translucent setting powder, focusing on areas that tend to get oily.
Step 2: Rosy Blush on Cheeks and Eyes:
- Use a soft, rosy blush that matches the color scheme for both your cheeks and eyes.
- Apply the rosy blush to the apples of your cheeks using a blush brush, blending it upwards along your cheekbones.
- With the same blush, apply a sheer wash of color to your eyelids using an eyeshadow brush. This will create a cohesive monochromatic effect.
Step 3: Define Your Eyes:
- Apply a neutral eyeshadow shade (similar to your skin tone) on your eyelids using an eyeshadow brush. This will add dimension while keeping the focus on the rosy blush.
- If desired, apply a thin coat of mascara to your upper and lower lashes to define your eyes.
Step 4: Nude Lipstick
- Choose a sheer nude lipstick that complements your skin tone and complements the rosy blush.
- Apply the sheer nude lipstick to your lips, allowing the natural color of your lips to shine through while adding a touch of warmth.
Step 5: Red Lipstick Accents
- Apply a small dot of red lipstick to the center of your lower lip. This subtle touch will tie the red lipstick with the rest of the look.
- Gently press your lips together to blend the red and nude lipsticks for a seamless transition.
Step 6: Optional Brow Definition
If desired, define your brows using a brow pencil or powder. Opt for a natural shape that enhances your features without overpowering the look.
Step 7: Finishing Touches
- Gently blend any harsh edges in your makeup using a clean brush or sponge.
- Use a setting spray to set your makeup while adding a subtle glow and ensuring its longevity.
And there you have it – the “Monochromatic Vibes” natural makeup look paired with red lipstick. This look showcases a harmonious color scheme by using rosy tones on your cheeks and eyes, while the subtle red accents tie in beautifully with the nude lips, creating a cohesive and polished appearance.
7. Natural Glam
- Apply a shimmery champagne eyeshadow on your lids.
- Use a lengthening mascara to make your lashes pop without being too dramatic.
Absolutely, let’s proceed with the “Natural Glam” makeup look paired with red lipstick. Here’s a step-by-step guide to achieving this subtly glamorous yet natural look:
Products You’ll Need:
- Shimmery champagne eyeshadow
- Lengthening mascara
- Red lipstick
- Brow pencil or powder (optional)
- Tinted moisturizer or light foundation (optional)
- Translucent setting powder (optional)
- Makeup brushes
Step 1: Prep Your Skin:
- Begin with a clean, moisturized face. Apply a light layer of tinted moisturizer or a sheer foundation for a fresh, radiant base.
- Set your makeup with translucent setting powder to ensure it stays in place throughout the day.
Step 2: Shimmery Champagne Eyeshadow:
- Apply a shimmery champagne eyeshadow to your eyelids using an eyeshadow brush.
- Focus the eyeshadow on the center of your lids to add brightness and a touch of glamour to your eyes.
Step 3: Define Your Eyes:
If desired, apply a neutral eyeshadow shade (similar to your skin tone) to the crease of your eyelids using a blending brush. This will add subtle depth to your eyes while keeping the focus on the shimmery champagne shade.
Apply a thin line of eyeliner close to your upper lash line for added definition. Opt for a soft brown or taupe shade for a more natural look.
Step 4: Lengthening Mascara:
- Use a lengthening mascara to coat your upper and lower lashes. Wiggle the mascara wand at the base of your lashes and then sweep it upward to elongate and define them.
- Apply one or two coats to achieve a subtle yet impactful effect.
Step 5: Red Lipstick:
- Choose a red lipstick that complements your skin tone and adds a touch of boldness to the look.
- Apply the red lipstick to your lips, ensuring even coverage. A lip brush can help achieve precise application.
Step 6: Optional Brow Definition:
If desired, define your eyebrows using a brow pencil or powder. Create a polished shape that enhances your eyes without overpowering the look.
Step 7: Finishing Touches:
Gently blend any harsh edges in your makeup using a clean brush or sponge.
Use a setting spray to set your makeup and give your skin a radiant finish.
And there you have it – the “Natural Glam” makeup look paired with red lipstick. This look combines a touch of shimmer on the eyes with subtle definition and lengthening mascara, all while letting the bold red lips take center stage.
8. Fresh and Youthful
- Opt for a tinted moisturizer for a fresh-faced appearance.
- Use a soft pink blush on your cheeks for a youthful flush.
Here’s a step-by-step guide to achieving this youthful and radiant look:
Products You’ll Need:
- Tinted moisturizer
- Soft pink blush
- Red lipstick
- Brow pencil or powder (optional)
- Mascara
- Makeup brushes
Step 1: Prep Your Skin:
- Begin with a clean and moisturized face.
- Apply a tinted moisturizer to even out your skin tone and provide a lightweight, natural coverage.
Step 2: Soft Pink Blush:
- Use a soft pink blush to add a youthful flush to your cheeks.
- Smile to locate the apples of your cheeks, then apply the blush using a blush brush in a gentle upward motion.
Step 3: Define Your Eyes:
If desired, lightly define your eyes using a neutral eyeshadow shade that complements your skin tone. Apply the eyeshadow all over your eyelids using an eyeshadow brush.
Step 4: Mascara:
Apply one or two coats of mascara to your upper and lower lashes to open up your eyes and enhance your lashes.
Step 5: Red Lipstick:
- Choose a red lipstick shade that adds a pop of color to your lips.
- Apply the red lipstick to your lips, starting from the center and moving outward. Use a lip brush for precise application if desired.
Step 6: Optional Brow Definition:
If desired, define your eyebrows using a brow pencil or powder. Create a natural shape that enhances your features without being too bold.
Step 7: Finishing Touches:
- Gently blend any harsh edges in your makeup using a clean brush or sponge.
- Use a setting spray to set your makeup while adding a fresh and radiant finish.
And there you have it – the “Fresh and Youthful” makeup look paired with red lipstick. This look focuses on achieving a natural and youthful appearance with a tinted moisturizer, soft blush, and a pop of red on the lips, creating a balanced and vibrant look.
9. Bronzed Beauty
- Apply a warm bronzer to the hollows of your cheeks, temples, and jawline.
- Keep your eye makeup minimal with a swipe of brown eyeshadow and mascara.
Here’s a step-by-step guide to achieving this sun-kissed and radiant look:
Products You’ll Need:
- Warm bronzer
- Brown eyeshadow
- Mascara
- Red lipstick
- Brow pencil or powder (optional)
- Tinted moisturizer or light foundation (optional)
- Translucent setting powder (optional)
- Makeup brushes
Step 1: Prep Your Skin:
- Begin with a clean and moisturized face. Apply a light layer of tinted moisturizer or a sheer foundation for a natural base.
- Set your makeup with translucent setting powder to control shine and help it last longer.
Step 2: Apply Warm Bronzer:
- Use a warm-toned bronzer that’s a few shades darker than your skin tone.
- Apply the bronzer to the hollows of your cheeks, temples, and along your jawline to create a sun-kissed effect. Use a fluffy bronzer brush for a soft application.
Step 3: Minimal Eye Makeup:
- Use a brown eyeshadow that’s slightly darker than your skin tone.
- Apply the brown eyeshadow all over your eyelids using an eyeshadow brush, focusing on creating a soft definition.
- Apply a coat or two of mascara to your upper and lower lashes to enhance your eyes without being overly dramatic.
Step 4: Red Lipstick:
- Choose a red lipstick that complements your skin tone and adds a touch of boldness to the look.
- Apply the red lipstick to your lips, ensuring even and precise coverage. A lip brush can help achieve a polished finish.
Step 5: Optional Brow Definition:
If desired, define your eyebrows using a brow pencil or powder. Create a natural shape that frames your face.
Step 6: Finishing Touches:
- Gently blend any harsh edges in your makeup using a clean brush or sponge.
- Use a setting spray to set your makeup and give your skin a radiant finish.
And there you have it – the “Bronzed Beauty” makeup look paired with red lipstick. This look combines a bronzed complexion with minimal eye makeup and bold red lips, creating a harmonious and captivating appearance.
10. Luminous Eyes:
- Use a pearl or champagne eyeshadow on your eyelids to brighten your eyes.
- Apply a thin line of brown eyeliner and a coat of mascara.
Certainly, let’s proceed with the “Luminous Eyes” makeup look paired with red lipstick. Here’s a step-by-step guide to achieving this bright and radiant look:
Products You’ll Need:
- Pearl or champagne eyeshadow
- Brown eyeliner
- Mascara
- Red lipstick
- Brow pencil or powder (optional)
- Tinted moisturizer or light foundation (optional)
- Translucent setting powder (optional)
- Makeup brushes
Step 1: Prep Your Skin:
Begin with a clean and moisturized face. Apply a light layer of tinted moisturizer or a sheer foundation for a radiant base.
Set your makeup with translucent setting powder to control shine and help it last longer.
Step 2: Apply Pearl or Champagne Eyeshadow:
Use a pearl or champagne eyeshadow shade to brighten your eyelids and make your eyes pop.
Apply the eyeshadow to your eyelids using an eyeshadow brush, focusing on the center of the lids for maximum luminosity.
Step 3: Brown Eyeliner:
Choose a soft brown eyeliner pencil for a natural look.
Apply a thin line of brown eyeliner along your upper lash line to define your eyes without making them appear too heavy.
Step 4: Mascara:
Apply a coat or two of mascara to your upper and lower lashes to enhance the length and volume of your lashes.
Step 5: Red Lipstick:
Choose a red lipstick that complements your skin tone and adds a bold element to the look.
Apply the red lipstick to your lips, ensuring even coverage. A lip brush can help achieve a polished finish.
Step 6: Optional Brow Definition:
If desired, define your eyebrows using a brow pencil or powder. Create a natural shape that enhances your features without being too bold.
Step 7: Finishing Touches:
Gently blend any harsh edges in your makeup using a clean brush or sponge.
Use a setting spray to set your makeup and give your skin a radiant finish.
And there you have it – the “Luminous Eyes” makeup look paired with red lipstick. This look focuses on creating bright, luminous eyes with a touch of eyeliner, while the bold red lips add a striking contrast and balance to the overall appearance.